
Provisional Crowns Made Simple
- Jun 10, 2011
- 2 min read
I recently had a request from a reader to go into further detail on my technique for fabricating provisional crowns. Let’s do it!
A patient presents with recurrent decay under a mesio-occlusal porcelain inlay on tooth # 31. There is also a large buccal amalgam restoration, so the tooth was treatment planned for a full-coverage crown.

#31 planned for full-coverage crown
While I’m waiting for my anesthesia to take effect, I take an impression of the tooth before it has been prepared. I use alginate in a quadrant tray for a single tooth.

Alginate in a quadrant tray, pre-operatively
If the tooth is going to be in a provisional for a long time, I would use a material like Template instead of alginate. I can keep the Template matrix in a safe place for months if I need to fabricate a new one. Alginate, on the other hand, would distort to the point of being useless after one day.
Now have fun and prepare the tooth.
Okay, provisional time. I use bis-acryl most of the time. For a full discussion of this material, check out this post.
I recommend re-seating the tray in the mouth just to ensure it can be easily placed all the way down. Squirt the first bit of bis-acryl onto the tray and the rest in the matrix for tooth #31 up to the brim.

Squirt!
Now I wait until the little bit of bis-acryl on the tray is set. Remove the tray and check the fit in the mouth. Do not evaluate the bite just yet- the material is not fully set and may break. I’m just evaluating the marginal fit. Trim the excess with a diamond bur.
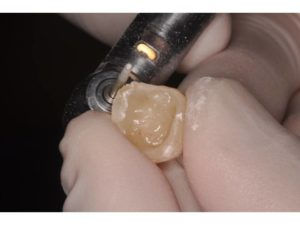
Diamonds are your best friend with bis-acryl
Almost done! Now you can check the occlusion and cement with your favorite temporary cement.

That'll do. That'll do.
This is a pretty simple technique. Most of my early challenges were due to not being familiar with the differences between bis-acryl and regular acrylic. Again, check out this post to learn more and save yourself some headaches.


Comments